Guest blog at Erica's Craft & Sewing Center: Spring is here...and though it may not look quite like Spring in northern Indiana, these quick-to- make pins and barrettes will brighten things up.
Clover Yo-Yo Makers make it easy to make nicely shaped yo-yos! Erica's carries a variety of shapes and sizes. Add some of our awesome Spring buttons, maybe a little ribbon, and tack to one of our Binding Clips (56424) and you have an adorable Spring time barrette. (Yes, I said binding clips...30 to a pkg!)
I used the Small (25079) and Large (25080) Yo Yo makers plus some fabric from Erica's scrap bin to whip up 3 barrettes plus a Spring Pin for my sweater in about an hour. The yo-yo's package directions are well written and easy to follow.
I used a heavy duty thread and pulled from both directions when gathering the yo-yo. However, you need to pay attention and make sure that you don't wrap your thread (middle picture, above) around the outside of the yo-yo maker! (Sometimes I think I'm allowed to do things around here just because I will mess things up and be able to tell everyone else what NOT to do! It saves everyone else time.) After you get the yo-yo nice and snug, just tie off and clip the ends. Voila!
The hardest thing I had to do was to decide which buttons to add! I finally settled on the Sun Seekers (49169), because there were 2 sizes of buttons in the package. I also liked that these buttons had a shank, which allowed the buttons to sit atop the yo-yo. The Spring Daisies (41336), Butterfly Beauty (41340) Easter Carrot Crop (26527) or any other of our other Spring buttons would have been pretty. I really wanted to open all the buttons and make barettes and pins all day!
After making the yo-yo and gathering the buttons and clips, the assembly of these little pretties went quickly.
You will need to decide whether you want to attach the ribbon to the front (blue barrette) or the back (yellow ribbon) and tack it on. Sew your button to the front of the yo-yo and tack your barette (quilt binding clip) to its back. I found (actually Cathy M. found) a pin back laying around the store and I decided to make a pin too! You could also attach these to headbands and pony tail holders. Or use a little glue and add a special touch to a little girl's Easter shoes!
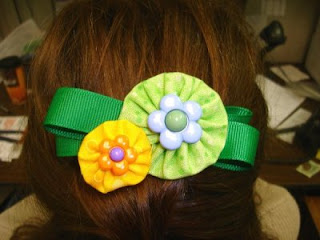
I made an adult-size barrette too!
In this order:
1. Sew the small button to the small yo-yo.
2. Overlap and attach the small yo-yo to the large yo-yo.
3. Sew the larger button to the large yo-yo.
4. Loop ribbon to the desired size and tack.
5. Tack ribbon to large yo-yo.
6. Tack to quilt binding clip! Done!
Here's the finished piece, modeled by Cindy (shipping mgr.).
Erica's carries many varieties of yo-yo makers. There are round ones of all sizes, butterflies, flowers, shamrocks, hearts and ovals. Pair those with all the beautiful buttons and I may never get back to work the possibilities are endless!
Guest Blogger: Cheryl Nelson
Be sure to become a Erica's Facebook Fan! You'll see great projects from customer's and Erica's employees, new items just into the store and be eligible for great giveaways! (To find an item or event on our web page after clicking on the underlined words, hold down the "Ctrl” key and touch F. Enter the item number in the box, press enter, and you’ll be taken to that item.) You can see what’s new at Erica’s almost every day! Any page of our website has a column on the left that tells you where to find things, and all you have to do is look for “What’s New” in purple, and click to find out.


No comments:
Post a Comment