Friday, May 20, 2011

Pretty Little Candle Holders

I had planned on a blog post about a floor cloth…but life and deadlines got in the way. So, looking around for something else to glue, I spotted some plain glass candle holders sitting on the shelf. They had a simple, smooth shape. Hmmmm?
First, I needed a pattern. I put a piece tape at the lip of the candle holder. Starting with the pencil at the taped edge, I drew a line along the top edge of the holder while rolling the holder across the paper. I ended back at the starting tape edge. Then I measured the depth of the candle holder and decided how wide I wanted my pattern.
With my desired measurement at the pencil line, I marked the second cutting line by moving the ruler and making marks parallel from the first line. I cut along those marks. (If your candle holder is the same diameter at the top and bottom, you would just need to measure the width and length for you pattern. My candle holder was slightly larger at the top than the bottom.)
I wrapped the pattern around the holder and marked the length, leaving a slight overlap, then cut away the excess paper.
Looking through my stash, I chose a beautiful Bali. I decided on a Bali print because it doesn’t really have a “wrong” side and would look good on each side of the glass. I used the pattern to cut the fabric pieces.
I watered down some Aleene’s OK to Wash-It Glue (29977) to a 3 part glue/1 part water ratio. (You really need permanent glue that dries clear and I really like this one for fabrics. Washable school glue is not recommended.)
Using a sponge brush, I applied the glue mixture on the outside of the candle holder. Then I carefully applied the fabric around the candle holder.
After smoothing the edges and ends, I brushed another coat of the glue mixture on top of the fabric. I wiped away the drips of glue with a wet towel and set them in the sun to dry.
Ta Da!
The possibilities are endless! You could use undiluted Aleene’s OK to Wash-It Glue (29977) to add ribbon, cording, buttons, charms, etc! I love the way the Bali looks like stained glass!

And yes, the unfinished floor cloth is in the background awaiting my return.  But first, I think I’ll head for the nearest Goodwill Store and see if I can find some more candle holders to cover!

Tuesday, April 19, 2011

Perler Beads?

Guest Blog from Erica's Craft & Sewing Center:

Have you ever heard of Perler Beads? I played with them as a child and honestly, I had forgotten all about them until the kits arrived in the store. If you haven’t heard of them, they are small beads made of food-safe plastic that you place on a plastic peg board. After placing the beads into the desired design or shape, you fuse them together by heating the beads with an iron.


Looking for a distraction from their TV, computer and video games, I was more than delighted to introduce these tiny little marvels to my grandsons: Eli, Caleb and Ben. We have been playing with them for over a year now and have went through three buckets full plus some!


Last week I picked up the Robots and Rockets Kit (#43087) before heading over to their house to babysit. This kit was a little different that the previous kits we have used. The plastic pegboard was clear and came with actual size pattern sheet with 11 designs. This was great! Instead of looking at the picture and trying to duplicate the shape/design on an opaque pegboard, you just slide the pattern underneath the pegboard and place the Perler Beads accordingly!


Ben decided to use the pattern just to outline his rocket and fill in with “rainbow colors”.


Eli and I sat and made the robot to match the pattern colors. These little beads are great for teaching a child hand-eye co-ordination, fine-tune motor skills and color matching.


They also help to develop your child's creativity and concentration levels, as evident with Caleb’s tongue sticking out. (Sadly to say, he probably got that from me!) Caleb likes the shaped peg boards, so he doesn’t feel obligated to match the colors. He can make his doggy (#A11061) just the way he likes.


After all the designs are made, carefully place the supplied pressing sheet atop the beads and iron with medium heat for about 10-12 seconds, moving the iron in a slow circular motion. Let cool and peel off the paper. Lift your design from the peg board and flip the design over onto your ironing surface. Cover it with the ironing paper and iron the other side to fuse it evenly. The peg board and pressing sheet are reusable.


It was a delightful afternoon. Next time, I think I’ll pick up some magnets to glue on the backs or maybe thread some cord or ribbon through for ornaments!

Wednesday, April 6, 2011

Barrette's and a Pin...Yo-Yo Style

Guest blog at Erica's Craft & Sewing Center: Spring is here...and though it may not look quite like Spring in northern Indiana, these quick-to- make pins and barrettes will brighten things up.


Clover Yo-Yo Makers make it easy to make nicely shaped yo-yos! Erica's carries a variety of shapes and sizes. Add some of our awesome Spring buttons, maybe a little ribbon, and tack to one of our Binding Clips (56424) and you have an adorable Spring time barrette. (Yes, I said binding clips...30 to a pkg!)


I used the Small (25079) and Large (25080) Yo Yo makers plus some fabric from Erica's scrap bin to whip up 3 barrettes plus a Spring Pin for my sweater in about an hour. The yo-yo's package directions are well written and easy to follow.


I used a heavy duty thread and pulled from both directions when gathering the yo-yo. However, you need to pay attention and make sure that you don't wrap your thread (middle picture, above) around the outside of the yo-yo maker! (Sometimes I think I'm allowed to do things around here just because I will mess things up and be able to tell everyone else what NOT to do! It saves everyone else time.) After you get the yo-yo nice and snug, just tie off and clip the ends. Voila!


The hardest thing I had to do was to decide which buttons to add! I finally settled on the Sun Seekers (49169), because there were 2 sizes of buttons in the package. I also liked that these buttons had a shank, which allowed the buttons to sit atop the yo-yo. The Spring Daisies (41336), Butterfly Beauty (41340) Easter Carrot Crop (26527) or any other of our other Spring buttons would have been pretty. I really wanted to open all the buttons and make barettes and pins all day!

After making the yo-yo and gathering the buttons and clips, the assembly of these little pretties went quickly.


You will need to decide whether you want to attach the ribbon to the front (blue barrette) or the back (yellow ribbon) and tack it on. Sew your button to the front of the yo-yo and tack your barette (quilt binding clip) to its back. I found (actually Cathy M. found) a pin back laying around the store and I decided to make a pin too! You could also attach these to headbands and pony tail holders. Or use a little glue and add a special touch to a little girl's Easter shoes!


I made an adult-size barrette too!


In this order:

1. Sew the small button to the small yo-yo.

2. Overlap and attach the small yo-yo to the large yo-yo.

3. Sew the larger button to the large yo-yo.

4. Loop ribbon to the desired size and tack.

5. Tack ribbon to large yo-yo.

6. Tack to quilt binding clip! Done!


Here's the finished piece, modeled by Cindy (shipping mgr.).


Erica's carries many varieties of yo-yo makers. There are round ones of all sizes, butterflies, flowers, shamrocks, hearts and ovals. Pair those with all the beautiful buttons and I may never get back to work the possibilities are endless!


It think I'll wear my pretty little pin out to dinner tonight! Happy Spring!


Guest Blogger: Cheryl Nelson

Be sure to become a Erica's Facebook Fan! You'll see great projects from customer's and Erica's employees, new items just into the store and be eligible for great giveaways! (To find an item or event on our web page after clicking on the underlined words, hold down the "Ctrl” key and touch F. Enter the item number in the box, press enter, and you’ll be taken to that item.) You can see what’s new at Erica’s almost every day! Any page of our website has a column on the left that tells you where to find things, and all you have to do is look for “What’s New” in purple, and click to find out.

Tuesday, March 29, 2011

Colorful Underground Camp

Guest Blog for Erica's Craft & Sewing Center:

In late February, I had the privilege of spending 3 1/2 days with wonderful friends, old and new, at the Camp Tecumseh Quilt Camp. It was great. Lots of fellowship, laughing, eating and of course, sewing! The group of 19 that I went to camp with included fellow Erica’s employees, past and present, PLUS some of Erica’s BEST customers and friends. There were 3 (S)Cheryls and 2 Karens, which can be very confusing! We are known as “Erica’s Ladies”, even though THE Erica has not been to camp....yet.
The guest speakers at quilt camp were the owners of Blue Underground Studios, Inc., Amy Walsh and Janine Burke. They were absolutely wonderful…and their quilts were gorgeous.  We were treated to an amazing presentation of their quilts.
Eclipse                               Jelly Beans
Jester's Court                    Curved Log Cabin

My daughter, Marcia, snapped this picture just as someone told Amy that I had put myself on a fabric restriction…NO NEW FABRIC for NEW projects for ONE YEAR! Yea, I can’t believe it myself, but don’t feel bad for me, as it has not kept me from buying fabric for OLD PROJECTS! This beautiful green quilt is Blue Underground Studios Toe the Lime Quilt.

Amy and Janine offered up great tips on color and technique. They challenged us to look past the quilt pictured on the cover of patterns and to make the quilt our own. Just because a quilt pictured on a pattern cover is made in bright colors doesn’t mean it won’t be great in reproductions and vice versa. You may also notice that most of their quilts do not include borders, as they feel that borders can "date" a quilt.  That tip sure frees me up, as I always have a hard time trying to decide what to quilt in a border!
Above are 3 versions of the In and Out (A12295) quilt.  All different, but equally stunning. (Be sure to click on the pattern images on our website to see additional colorways of the Blue Underground Studio quilt patterns that we carry.)

Amy also encouraged us to use a color wheel. I picked up at Color Tool (48077) at camp and I have to say that I have been captivated with this gadget ever since. I also picked up some color theory books...but that’s for a later blog!

Our group was fortunate to be in the same sewing room as Amy and Janine. They were great fun and very helpful. Liz asked Janine to help her with a project using her husband's old police uniforms. It was great watching them work together. A little later on, Amy encouraged me to leave my mis-sewn blocks of Mod Quads (A12291) as they were....till I accidentally sewed one that resembled a swastika. She rushed right over with her trusty seam ripper and had that seam out in a flash!

It was a fun filled weekend. The following are just a FEW of the pictures:
Diane finished her beautiful Magic Squares Quilt top (A11581). 
Cheryl B. checked out the beautiful and bright fabrics that Cookie used for her 4-Patch Stacked Posie Quilt (20145). It’s hard to believe that this quilt is made with just one fabric!
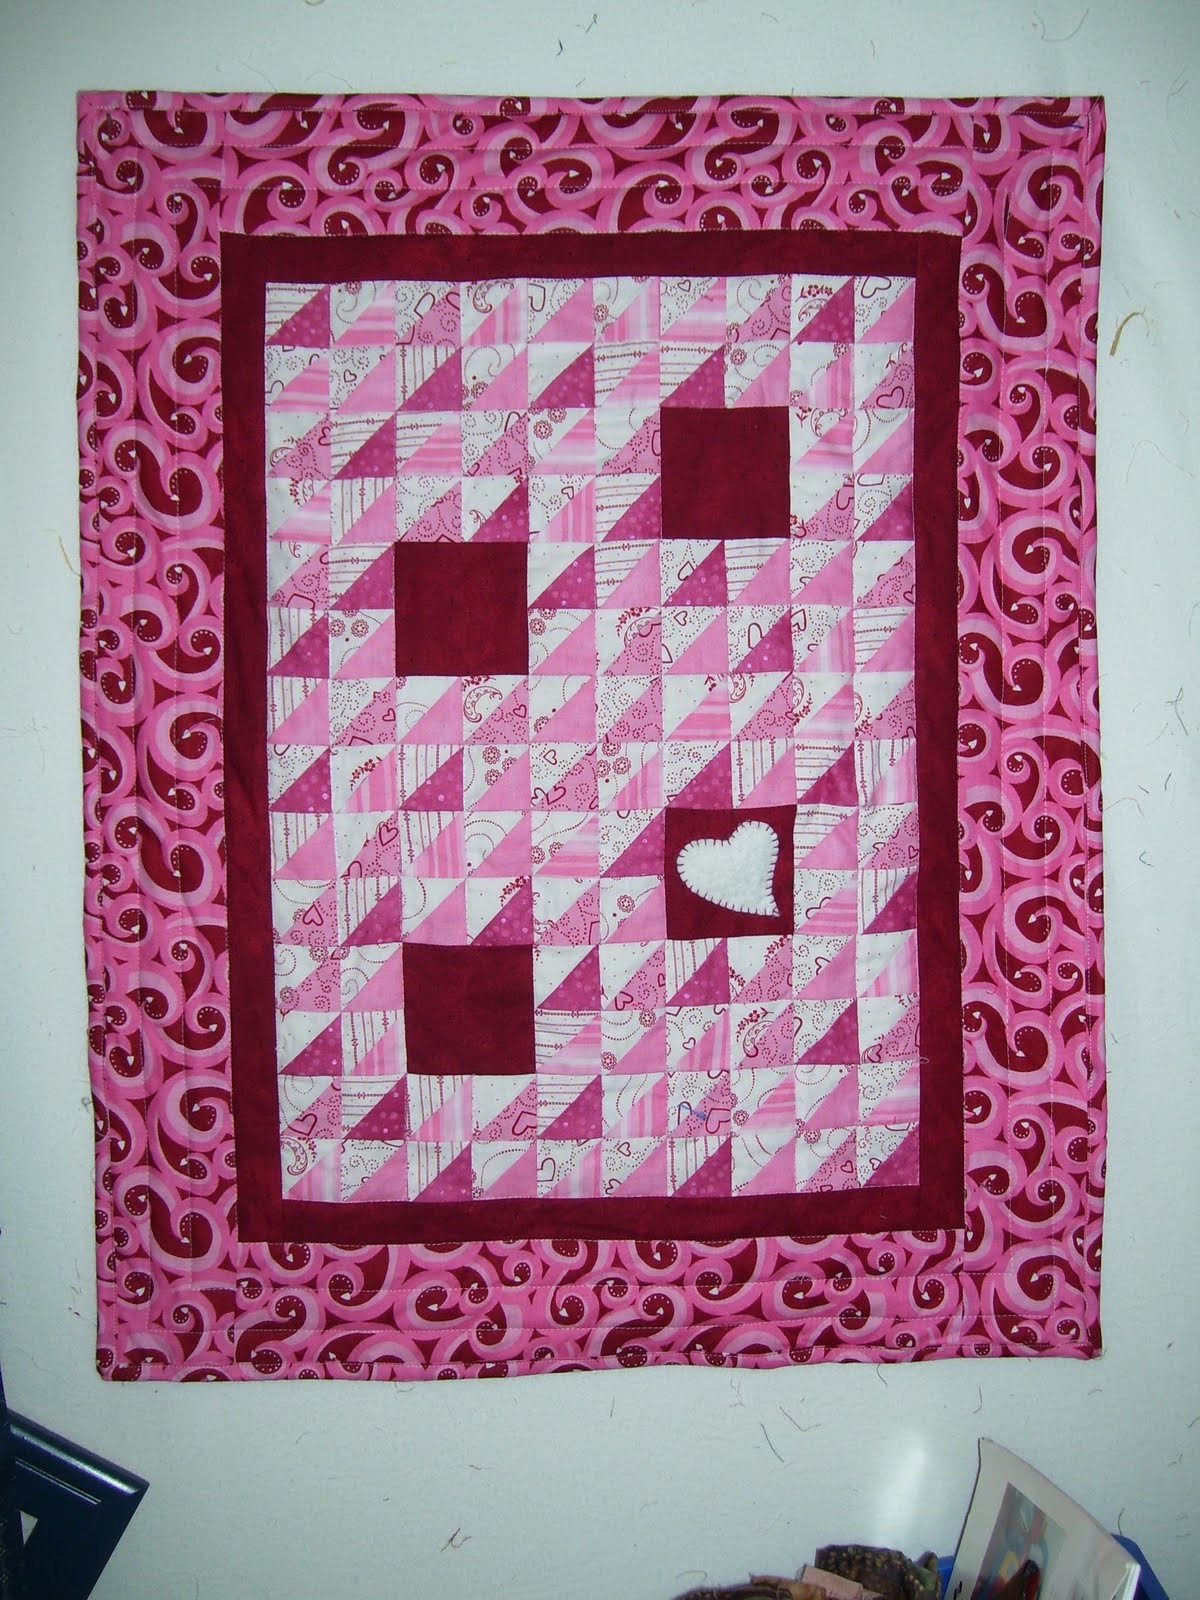
I finished my Valentine Table Topper…too late for this year’s Valentine’s Day, but I’m ready for the next. I made all those 1 1/2” half square triangles with the Star Singles (A11689). These little papers are great. Just sandwich your fabric squares and the paper template, sew on the lines, cut on the other lines and WA LA! EIGHT perfect half square triangles.
Karen G. (Front Counter) was very pleased, as she should have been, with her machine embroidered Wild!flowers quilt (19768)! Later she treated us with another of her beautiful quilts…quilted and bound!

Marcia finished her Rancher’s Daughter quilt. This quilt was the mystery quilt from the October 2010 Camp. Mine is yet to be completed. My daughter is much better at completing quilts than I. However, I am really good at starting them.  ;)
Joy (left) and her mother Sheryl S. were very productive. The two quilts hanging to the right of Joy are her FIRST two quilts! Sheryl got a head start on her Prairie Women’s Sewing Circle log cabin quilt.
There’s never a lack of opinions at camp (which is a good thing). Daisy and Cheryl B. are glad to share their opinions with Karen L. Later in the weekend she shared the finished top of her Pineapple Quilt from the book Sew Simple Pineapple (43454).
Linda (Front Counter) has been working on the Birthday quilt for years. The little 9-patch blocks are 2” UNFINISHED. She's much farther ahead that the rest of us with this mind boggling quilt!
Judy completed this cuddly quilt at camp. It is simply a four patch block alternating with plain chenille blocks. Everyone just wanted to wrap themselves up in it! You can see Judy on Amy’s blog making the “He Loves Me, He Loves Me Not” quilt (44690/69790).
Meg completed her Roll Roll Cotton Boll Mystery Quilt top. This quilt is stunning with over 3000 pieces!
Cookie and Marcia show off their Rancher’s Daughter quilt tops that they finished at camp. Again, same quilt but with totally different “feels” because of the fabrics used.
This is my version of Blue Underground's Mod Quads quilt. Actually, I called my quilt Mod Podge Quads…because of the aforementioned mis-sewn blocks! But at least there are no swastikas!

I can’t wait for October Camp!

Monday, February 28, 2011

February UFO Completed

I finished my February Grab Bag Tablerunner at Quilt Camp!

MORE about Quilt Camp later!

Sunday, January 30, 2011

January UFO Done...at least for now

This is my Critter's Quilt top. It's as done as I'm going to get it for now. I have all the trees, leaves, and animals ready to go for the border, but I just don't know if I want the quilt exactly like the original. So, it's going to hang on my design wall, until it "tells" me what it wants. :)
Ready for February!

Saturday, January 29, 2011

Baby Quilts Finished...at least my part.

I finally finished quilting 2 baby quilts. Yippee!
Marcia will sew on the binding and they will be completely finished. (I laid the quilts on the binding fabric to get an idea on what the finished product will look like.)

The Prairie Womens Sewing Circle had 27 ladies! Quite a group! Cathy and I were nervous throughout the day, leading up to class. It didn't go too bad. I did think of lots of things I should have said/taught after class. Go figure.

Still lots to do. I haven't been able to work on my Critter Quilt and it is supposed to be complete by Monday night. Urggg...I'd better get busy!